Tuesday, May 15, 2012

Raw Mexican Fajitas

I found this Raw recipe on the blog Sweetly Raw {great blog for raw recipes!}. I have to say, this is a close rival to the cooked version, even my 13 year-old gobbled it up! I wasn't sure if I would be a fan of the raw cream cheese and cheddar sauce (since I love to eat the original versions) but I was pleasantly surprised!
I made everything the night before, letting the veggies marinate. The next day I was all set for quick and easy lunch.


Raw Veggie Fajitas
Let marinate for a few hours for the veggies to absorb the juices and soften.
I left over-night with perfect results. Serve in romaine lettuce leaves with homemade salsa and/or diced avocado.

2 large portobello mushrooms
3 bell peppers, sliced into strips
1 zucchini, sliced into sticks
1 sweet or red onion, thinly sliced
2 cloves garlic, minced
1/4 cup nama shoyu or tamari
1/4 cup extra virgin olive oil
2 tablespoons chili powder
1 teaspoon cumin
1/8 - 1/4 teaspoon cayenne 
1 tablespoon apple cider vinegar
 
Sour Cream
3/4 cup raw cashews
3/4 cup young coconut pulp
1/2 cup water
1- 3 tablespoons lemon juice
1/4 - 1/2 teaspoon sea salt

Blend all ingredients until smooth and creamy in a high speed blender. 
Chill for a few hours.


Cheddar Sauce
1 large red bell pepper
2-3 tablespoons water
1 cup cashews
2 1/2 tablespoons nutritional yeast
1 tablespoon tahini (or sesame seeds)
2 teaspoon onion powder
1 1/4 teaspoon sea salt
1 large clove garlic
2 tablespoons lemon juice

Blend all ingredients until smooth and creamy. Chill.

Tuesday, May 1, 2012

Farm-to-Table Cooking Classes

HUDSON VALLEY Farm to Table Cooking Classes

(My Logo Design)


If you are visiting the Hudson Valley you don't want to miss the opportunity to join Chef, Cathy Vogt from A NATURAL CHEF, as she teaches you how to make amazing meals with the local harvest in season.

Each class will conclude with a meal around the table overlooking the farm.
The first classes will take place at Meadow View Farm, just a few miles from down-town New Paltz. The farm is serene with amazing views. They also have a farm stand with 
Picked-Daily Produce in Season
Grass-Fed & Finished Beef
Free Range Eggs
Farm Fresh Goat Cheese

And, they are in the process of renovating one of their barns into a Country Store. Their Country Store will include select items from around the Hudson Valley.

Check out A Natural Chef, or Meadow View Farm for details!!


Friday, April 20, 2012

4 Layer Carrot Cake

I found this recipe for baking a cake on a cookie sheet- the two bonuses
  1. Cooks in 15 mins.
  2. Layers! I love layer cakes!


The recipe comes from Cooks Illustrated.

CARROT LAYER CAKE

Ingredients

Cake
  • 1 3/4cups (8 3/4 ounces) all-purpose flour
  • 2teaspoons baking powder
  • 1teaspoon baking soda
  • 1 1/2teaspoons ground cinnamon
  • 3/4teaspoon ground nutmeg
  • 1/2teaspoon salt
  • 1/4teaspoon ground cloves
  • 1 1/4cups (8 3/4 ounces) light brown sugar
  • 3/4cup vegetable oil
  • 3large eggs
  • 1teaspoon vanilla extract
  • 2 2/3cups shredded carrots (4 carrots)
  • 2/3cups dried currants
  •  
Frosting
  • 16tablespoons unsalted butter , softened
  • 3cups (12 ounces) confectioners' sugar
  • 1/3cup buttermilk powder
  • 2teaspoons vanilla extract
  • 1/4teaspoon salt
  • 12ounces cream cheese , chilled and cut into 12 equal pieces
  • 2cups (8 ounces) pecans , toasted and chopped coarse


Instructions

FOR THE CAKE

  1. Adjust oven rack to middle position and heat oven to 350 degrees. Grease 18 by 13-inch rimmed baking sheet, line with parchment paper, and grease parchment. Whisk flour, baking powder, baking soda, cinnamon, nutmeg, salt, and cloves together in large bowl.
  2. Whisk sugar, oil, eggs, and vanilla together until mixture is smooth. Stir in carrots and currants. Add flour mixture and fold with rubber spatula until mixture is just combined.
  3. Transfer batter to prepared baking sheet and smooth surface with offset spatula. Bake until center of cake is firm to touch, 15 to 18 minutes. Cool in pan on wire rack for 5 minutes. Invert cake onto wire rack (do not remove parchment) and then reinvert onto second wire rack. Cool cake completely, about 30 minutes. 

 FROSTING
  1. Place 6 by 8-inch cardboard rectangle on cake turntable or plate. Place 1 cake rectangle, parchment side up, on cardboard and carefully remove parchment. Using offset spatula, spread 2/3 cup frosting evenly over cake layer. Repeat with two more layers of cake, frosting each layer with 2/3 cup frosting and pressing gently on each layer to level. Place last rectangle of cake on top and frost top of cake with 1 cup frosting. Use remaining frosting to coat sides of cake. (It’s fine if some crumbs show through frosting on sides, but if you go back to smooth top of cake, be sure that spatula is free of crumbs.)
  2.  Hold cake with 1 hand and gently press chopped pecans onto sides with other hand. Chill for at least 1 hour before serving.

To Make Ahead: The cake may be refrigerated for up to 24 hours before serving.


 This is a keeper! Simple, yummy, and unique.

Tuesday, March 20, 2012

RAW chocolate brownies

Here is my first RAW “un-cooking” experience! Chocolate Brownies with Chocolate Ganache Frosting.
image
I first started with the ganache frosting since that had to slightly melt.
You combine 1/2 coconut oil, 1/2 cup raw cacao powder, and 2 table spoons of raw agave (my question is can agave actually be “raw”? Since i’ve seen it on multiple “raw” sites, i’m assuming, yes?). Place ingredients in a bowl & place over a pan of hot water, the warmth from the hot water will eventually melt the oil. Stir to combine.
image
Next, combine 1 cup raw walnuts, 1 cup raw pecans, and 1 cup dates in a food processor (i used my vita-mix which worked, but maybe processed it too much). Pulse a few times and then add in 1/2 cup raw cacao powder, pulse more until mixture is combined. {optional-add in some raw cacao nibs for added crunch}.
image
Press dough into a lined pan.
image
My pan was much larger than I need, but it worked fine. Just form into a square shape & chill in freezer or refrigerator for about 20 mins. Frost with ganache & top with crushed sea salt {optional}. return to refrigerator.
image
Serve chilled or at room temperature. Healthy alternative to baked brownies and sure to cure any sweet tooth!!

Saturday, February 25, 2012

NIRMALA Cooking Live on Martha Stewart

A few weeks ago I attended The Martha Stewart Show with my client Nirmala Nardine of NIRMALA'S KITCHEN. Nirmala, pictured with Martha, made a Moroccan Chicken Tagine that looked amazing & the smelled delicious!
I just now got around to making it myself and all I have to say is yummy!

Having my kitchen stocked with all of Nirmala's spices made this a quick & easy dinner. The only thing I did different was to omit the cranberries. You can get the recipe for Moroccan Chicken Tagine & watch the video on Martha's website.

Note to self....order more of Nirmala's Couscous because it goes with everything and it is so quick-n-easy to make!!

Thursday, January 19, 2012

Recycle Artwork into New Designs


Here's the perfect project to get you off your computer & enjoying some hands-on creating!

Ever wonder what to do with all of the art work your kids make at school? Are you running out of wall space to hang it all, or do you have boxes & bins over-flowing with drawings that you can't bare to part with? I do!

Here are just a few of my favorite watercolors done by my daughters.


I decided to take a Zen approach to my issue....cutting little pieces of each of the paintings to create one collage. This way I could view a little of each one, or at least feel that they were represented. The result was a piece of art not only created by my daughters, but myself, as I patiently leafed through the paintings, cutting and arranging to make a cohesive piece.


Next, I'd like to try a combo of their paintings, drawings, and writing....stay tuned!

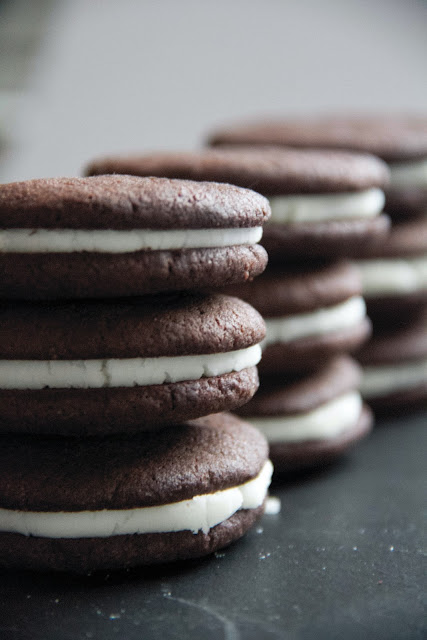
Homemade Oreo Cookies


Homemade Oreos from SmittenKitchen.com, Adapted from Retro Desserts, Wayne Brachman

Makes 25 to 30 sandwich cookies

For the chocolate wafers:
1 1/4 cups all-purpose flour
1/2 cup unsweetened Dutch process cocoa {i used Equal Exchange Organic Baking Coca}
1 teaspoon baking soda
1/4 teaspoon baking powder
1/4 teaspoon salt
1 cup sugar
1/2 cup plus 2 tablespoons (1 1/4 sticks) room-temperature, unsalted butter
1 large egg

For the filling:
1/4 cup (1/2 stick) room-temperature, unsalted butter
1/4 cup vegetable shortening {i used Spectrum Organic Veg. Shorting}
2 cups sifted confectioners’ sugar
2 teaspoons vanilla extract
  1. Set two racks in the middle of the oven. Preheat to 375°F.
  2. In a food processor, or bowl of an electric mixer, thoroughly mix the flour, cocoa, baking soda and powder, salt, and sugar. While pulsing, or on low speed, add the butter, and then the egg. Continue processing or mixing until dough comes together in a mass.
  3. Take rounded teaspoons of batter and place on a parchment paper-lined baking sheet approximately two inches apart. With moistened hands, slightly flatten the dough. Bake for 9 minutes, rotating once for even baking. Set baking sheets on a rack to cool.
  4. To make the cream, place butter and shortening in a mixing bowl, and at low speed, gradually beat in the sugar and vanilla. Turn the mixer on high and beat for 2 to 3 minutes until filling is light and fluffy.
  5. To assemble the cookies, in a pastry bag with a 1/2 inch, round tip, pipe teaspoon-size blobs of cream into the center of one cookie. Place another cookie, equal in size to the first, on top of the cream. Lightly press, to work the filling evenly to the outsides of the cookie. Continue this process until all the cookies have been sandwiched with cream. Dunk generously in a large glass of milk.

the batter was thick, drier than your usual cookie dough


with a scooper I was able to get even sizing
 
you'll then want to hand-roll each cookie, this will create a smoother edge. I tried just flattening the "scooped dough" and the edges broke. while it tasted the same, it didn't look like a true Oreo. Also, be sure to flatten them enough, they don't spread as much as you might think, my first batch resembled more of a Whoopie-pie than an Oreo.

In conclusion, lots of time & effort goes into these cookies. You have to really love Oreo cookies for this recipe. I personally don't like Oreo's {sorry} but my girls wanted to give it a try. They loved them, and the flavor was spot-on {without all of the junk that's in conventional oreos}. This is a fun novelty treat for someone special.