Thursday, January 19, 2012

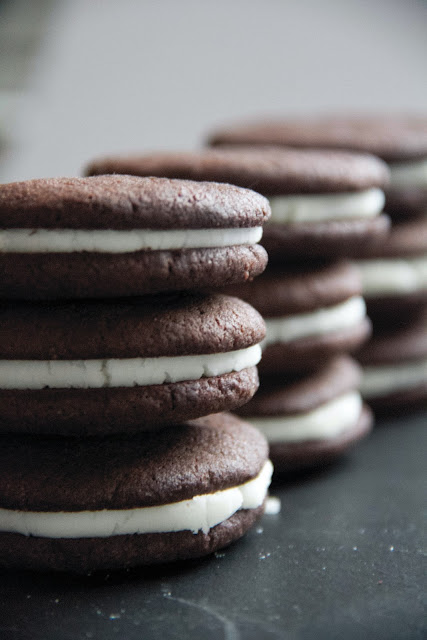
Homemade Oreo Cookies


Homemade Oreos from SmittenKitchen.com, Adapted from Retro Desserts, Wayne Brachman

Makes 25 to 30 sandwich cookies

For the chocolate wafers:
1 1/4 cups all-purpose flour
1/2 cup unsweetened Dutch process cocoa {i used Equal Exchange Organic Baking Coca}
1 teaspoon baking soda
1/4 teaspoon baking powder
1/4 teaspoon salt
1 cup sugar
1/2 cup plus 2 tablespoons (1 1/4 sticks) room-temperature, unsalted butter
1 large egg

For the filling:
1/4 cup (1/2 stick) room-temperature, unsalted butter
1/4 cup vegetable shortening {i used Spectrum Organic Veg. Shorting}
2 cups sifted confectioners’ sugar
2 teaspoons vanilla extract
  1. Set two racks in the middle of the oven. Preheat to 375°F.
  2. In a food processor, or bowl of an electric mixer, thoroughly mix the flour, cocoa, baking soda and powder, salt, and sugar. While pulsing, or on low speed, add the butter, and then the egg. Continue processing or mixing until dough comes together in a mass.
  3. Take rounded teaspoons of batter and place on a parchment paper-lined baking sheet approximately two inches apart. With moistened hands, slightly flatten the dough. Bake for 9 minutes, rotating once for even baking. Set baking sheets on a rack to cool.
  4. To make the cream, place butter and shortening in a mixing bowl, and at low speed, gradually beat in the sugar and vanilla. Turn the mixer on high and beat for 2 to 3 minutes until filling is light and fluffy.
  5. To assemble the cookies, in a pastry bag with a 1/2 inch, round tip, pipe teaspoon-size blobs of cream into the center of one cookie. Place another cookie, equal in size to the first, on top of the cream. Lightly press, to work the filling evenly to the outsides of the cookie. Continue this process until all the cookies have been sandwiched with cream. Dunk generously in a large glass of milk.

the batter was thick, drier than your usual cookie dough


with a scooper I was able to get even sizing
 
you'll then want to hand-roll each cookie, this will create a smoother edge. I tried just flattening the "scooped dough" and the edges broke. while it tasted the same, it didn't look like a true Oreo. Also, be sure to flatten them enough, they don't spread as much as you might think, my first batch resembled more of a Whoopie-pie than an Oreo.

In conclusion, lots of time & effort goes into these cookies. You have to really love Oreo cookies for this recipe. I personally don't like Oreo's {sorry} but my girls wanted to give it a try. They loved them, and the flavor was spot-on {without all of the junk that's in conventional oreos}. This is a fun novelty treat for someone special.

Another....Six Layer Cake

Match your cake to your party!! Here is my daughter's 12th birthday Cake. I debated on serving the cake as shown below, without the outer-layer of frosting, but opted to frost it in the end. With the amount of frosting piled between each layer, there is plenty to balance the cake even without the outer layer. This way, you can showcase your colorful design!


Friday, September 9, 2011

Six Layer Cake


I once again tried the six layer cake (using the "rainbow Cake recipe") in a previous post. This time I went for a "watercolor" effect, using shades of one color. I think this would work perfect for a color-themed party or baby shower (in shades of pink or blue).

Thursday, September 1, 2011

GLUTEN FREE Chocolate Chip Scones

I have a new favorite scone recipe. BabyCakes raspberry scones were top of my list for a long time, but these Chocolate Chip scones are tough to beat!

My Gluten Free Chocolate Chip Scones have been tested by my "gluten-loving" family, and they have been given rave reviews!!

Here is my super-easy {and flexible} recipe 
{preheat oven to 350}

• 2 1/2 cups of almond flour
• 1/2 teaspoon salt
• 1/2 teaspoon baking soda

whisk together dry ingredients---

• 1/3 cup of coconut oil or grapeseed oil
   {i used 1/2 of each to equal 1/3 cup}
• 1/3 cup agave nectar
• 2 large eggs

whisk together wet ingredients---

• fold in 1/3 cup of old fashioned oats
• fold in 1 cup of chopped dark chocolate
{for this batch I used 1/2 cup of semi-sweet chocolate chips and 1/2 cup of chopped milk chocolate bar. Just happened to be what I had it the house}

use a 1/4 cup scooper to scoop on baking sheet.
I like mine cooked a little crispy, so I cook for 15mins.
depending on your oven, I'd say 12-17mins.


Yum! perfect for breakfast {good source of protein} or dessert. And, they freeze perfectly. I pull them out of the freezer, place in microwave for 20 seconds.
Enjoy!

Thursday, July 14, 2011

Logo design HELEN OF MEMPHIS


A local Artist, formally from Memphis, needed a logo for her budding craft business. Her dream is to one day have a store where this antique store sign will adorn her store front. She needed a logo that while different from the sign, would represent the same feel. This is what I came up with.....


you can learn more about Helen on her etsy shop.

Mini Blueberry Tarts


If you are heading to the HUDSON VALLEY this weekend, there's still time to get in some blueberry picking! I went last weekend to HODGSON FARM in Walden, NY where they said their blueberries are chemical-free!

We picked enough blueberries for snacking, smoothies, freezing, and baking.

Our first baking project were these simple Mini Blueberry Tarts. 


Best Rainbow Cake Recipe

I've seen many posts on "Rainbow Cakes", and my daughters 13th birthday gave me the perfect opportunity to give it a try.


{I want to give myself a disclaimer on the photos and cake decorating. With the limited time I had on this baking project, decorating was a "quickie" and the photos were shot super-fast with my iphone}.

This recipe, taken directly from the "Whisk Kid" blog, was PERFECT!!
I was amazed how evenly and flat each layer baked and the flavor was delicately textured. The only adjustment I made to the cake was decreasing the amount of food-coloring {for a slightly more natural look}.

For the frosting, I followed the the recipe for the "fill and crumb coat" but I used a lighter frosting on the outside.

This is after assembling and "coating" the outside of the cake. I baked the cake in the evening and refrigerated it over-night. The frosting hardened, making it the perfect surface for a final frost. While I'm a big fan of "it's best the day you bake it", in this case after bringing it to room temperature it still tasted perfect.


For the outside frosting I wanted to use something lighter,  a little more fluff and a little less butter. This helped to balance the richness of the buttery frosting on the inside, but with the warm weather of the day, the frosting started to melt before we cut-into the cake. Minor miss-hap, but something to consider.

Here is the Last Piece Standing!! {p.s. I know I messed-up the order of the rainbow!! It made for a good laugh. Once you place that layer, there's no taking it back :)

I can't wait to make this recipe again! Next time I'll try shades of one color!


{RECIPE BY WHISK KID RECIPES}

Super Epic Rainbow Cake
I'm adding a disclaimer here: THERE IS A LOT OF FROSTING/BUTTER IN THIS CAKE. I used a lot because I wanted the cake to be very striking visually. It is intentional. Put in less if you want. Also, I'm not forcing you to eat this entire cake by yourself, so - seriously - quit freaking out about the butter.

White Cake (but not really)
I made things difficult on myself and altered a coconut cake recipe for this. I don't know why I didn't just make a white cake from a white cake recipe, but.... I didn't. Here's the source if you're looking to make a coconut cake. It looks divine, but my friends don't like coconut :(
2 sticks (226 g) butter, room temp
2 1/3 c (466 g) sugar
5 egg whites, room temp
2 teaspoons vanilla
3 c (375 g) flour
4 tsp baking powder
½ tsp salt
1 1/2 c (355 g) milk, warmed for 30 sec in microwave to bring to room temp
Red, orange, yellow, green, blue and purple GEL food coloring. Liquid will not be vibrant enough!

Preheat the oven to 350F degrees. Oil and line how ever many 9” cake pans you have (I have three and I just reused them).

Sift together the flour, baking powder and salt. Set aside.

Cream the sugar and butter, then add the egg whites (I cracked them all into one bowl) and add them a little at a time. Add the vanilla and mix until fully incorporated. Then, alternating between wet and dry, add the milk and flour mixture in two parts.

Divide the batter amongst 6 bowls (I did it by weight. Weigh your mixing bowl before you begin adding ingredients and then subtract the weight of the bowl from the final measurement after the batter is completed. Divide that number by six and add that weight of batter to each bowl), and then whisk a fair amount of the appropriate food color into each bowl. Keep in mind that the color of the unbaked batter will be the color of the baked batter. Pour into the pans and bake for 15 minutes each.

When you remove them from the oven, let them rest on the cooling rack, in the pan, for ten minutes. Then flip, cover, and stash them in the fridge to cool quickly.

To fill and crumb coat:
9 egg whites
1 ¾ c (350 g) sugar
4 sticks (532 g) of butter, room temp
2 tsp lemon extract

To frost:
5 egg whites
1 c (200 g) sugar
2 sticks (226 g) butter, room temp
1 tsp lemon extract

Cook the egg whites and sugar in a small saucepan over medium heat, whisking constantly, until the sugar is completely dissolved (test by rubbing some between your fingers. If it's completely smooth, it's done). Pour into another bowl (a stand mixer is preferable) and whip on high speed until room temp. Then, on a medium-slow speed, add the butter, waiting until each piece is completely incorporated before adding the next. After all the butter has been added, turn the mixer back to high speed and whip until it has come together, about five minutes. Add the extract, beat briefly and then use.

If the buttercream seems soupy after all of the butter is added and does not come together after whipping, refrigerate for 5 to 7 minutes and continue whipping until it becomes fluffy and workable.

Assembly
Stack the layers in your preferred order and fill and frost as you would any other cake.

Once frosted, the cake can be left on the counter without any problems, but feel free to refrigerate it. Just be sure that the cake is at room temperature when serving or the frosting will be hard, not smooth.